其他扩展
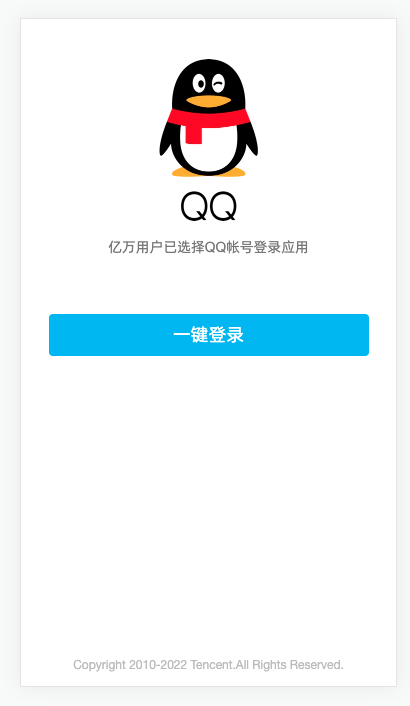
第三方登录-QQ登录流程

首先:
- 需要在 QQ互联 平台注册。
- 需要实名身份认证,审核通过。
- 然后创建我的web应用,需要有网站域名,需要域名备案号,设置登录成功回跳地址,审核通过。
- 得到 appid 和 回跳地址。
bash
# 测试用 appid
# 100556005
# 测试用 redirect_uri
# http://consult-patients.itheima.net/login/callback
1
2
3
4
2
3
4
步骤:
- 准备QQ登录按钮
- 准备回跳页面
- 使用 openID 进行登录
- 登录成功,跳转到来源页面
- 登录失败,显示绑定手机界面
- 绑定成功,跳转到来源页面
第三方登录-跳转QQ登录
步骤:
- 引入QQ登录SDK
- 生成QQ登录跳转链接
- 登录后回跳成功
- 本地host配置
代码:
1) 引入QQ登录SDK
index.html
vue
<script
  src="https://connect.qq.com/qc_jssdk.js"
  data-appid="102015968"
  data-redirecturi="http://consult-patients.itheima.net/login/callback"
></script>
1
2
3
4
5
2
3
4
5
2)生成QQ登录跳转链接,改成直接跳转
ts
  onMounted(() => {
    // 组件渲染完毕,使用QC生成QQ登录按钮,目的得到跳转链接
    QC.Login({
      btnId: 'qq'
    })
  })
1
2
3
4
5
6
2
3
4
5
6
html
<div class="icon" id="qq">
1
以上可以审查元素看到登录链接,复制后改成 A 标签改成 href 跳转即可
html
  <a
    href="https://graph.qq.com/oauth2.0/authorize?client_id=102015968&response_type=token&scope=all&redirect_uri=http%3A%2F%2Fconsult-patients.itheima.net%2Flogin%2Fcallback"
  >
    <img src="@/assets/qq.svg" alt="" />
  </a>
1
2
3
4
5
2
3
4
5
注意
在手机访问会走QQ登录手机页面,点击按钮唤起QQ应用进行登录,课堂无法演示(限制域名)
开发中可以把谷歌手机模拟器关闭,关闭后可以可以使用手机QQ扫码进行登录,可走通流程。

3)登录后回跳成功
链接如下,路由为 /login/callback
http://consult-patients.itheima.net/login/callback#access_token=B417C0C3EBF93A380A22A188A9C491A4&expires_in=7776000
1
4) 本地host配置 windows
1. 找到 C:\Windows\System32\drivers\etc 下hosts文件
2. 在文件中加入  127.0.0.1       consult-patients.itheima.net
3. 保存即可。
# 如果提示没有权限
1. 将hosts文件移到桌面,然后进行修改,确认保存。
2. 将桌面hosts文件替换c盘文件
1
2
3
4
5
6
2
3
4
5
6
mac OS
1. 打开命令行窗口
2. 输入:sudo vim /etc/hosts
3. 按下:i 键
4. 输入:127.0.0.1       consult-patients.itheima.net
5. 按下:esc
6. 按下:shift + :
7. 输入:wq 回车即可
1
2
3
4
5
6
7
2
3
4
5
6
7
5) vite 配置
ts
  server: {
    port: 80,
    host: true,
    open: true
  },
1
2
3
4
5
2
3
4
5
6)回跳地址白名单
diff
router.beforeEach((to) => {
  NProgress.start()
  const store = useUserStore()
+  const whiteList = ['/login', '/login/callback']
  if (!store.user?.token && !whiteList.includes(to.path)) return '/login'
})
1
2
3
4
5
6
2
3
4
5
6
第三方登录-进行登录
步骤:
- 路由规则,加入登录白名单,基础结构
- 编写QQ登录API函数
- 提供
QC相关的类型,使用QQ的SDK提供QC相关API获取openId - 提交三方登录亲请求
- 1 如果之前没绑定,失败:需要绑定手机
- 2 如果之前绑定过,成功:和之前登录成功一样的逻辑
- 刚注册用户,属于情况1
代码:
1)路由规则,加入登录白名单,基础结构
ts
    {
      path: '/login/callback',
      component: () => import('@/views/Login/LoginCallback.vue'),
      meta: { title: 'QQ登录-绑定手机' }
    }
1
2
3
4
5
2
3
4
5
ts
  // 不需要登录的页面,白名单
  const wihteList = ['/login', '/login/callback']
1
2
2
vue
<script setup lang="ts"></script>

<template>
  <div class="login-page">login-callback</div>
</template>

<style lang="scss" scoped></style>
1
2
3
4
5
6
7
2
3
4
5
6
7
2)编写QQ登录API函数
ts
export const loginByQQ = (openId: string) =>
  request<User>('/login/thirdparty', 'POST', { openId, source: 'qq' })
1
2
2
3)提供 QC 相关的类型,使用QQ的SDK提供 QC 相关API获取 openIdenv.d.ts
diff
interface Window {
  _AMapSecurityConfig: {
    securityJsCode: string
  }
+  QC: {
+    Login: {
+      check(): boolean
+      getMe(cb: (openId: string) => void): void
+    }
+  }
}
1
2
3
4
5
6
7
8
9
10
11
2
3
4
5
6
7
8
9
10
11
/Login/LoginCallback.vue 记录 openId 和 isBind
vue
<script setup lang="ts">
import { onMounted, ref } from 'vue'

const openId = ref('')
const isBind = ref(true)
onMounted(() => {
  if (window.QC.Login.check()) {
    window.QC.Login.getMe((id) => {
      openId.value = id
      // QQ,登录
      loginByQQ(id)
        .then((res) => {
          // 登录成功
        })
        .catch(() => {
          // 登录失败
          isBind.value = false
        })
    })
  }
})
</script>

<template>
  <div class="login-page">login-callback</div>
</template>

<style lang="scss" scoped></style>
1
2
3
4
5
6
7
8
9
10
11
12
13
14
15
16
17
18
19
20
21
22
23
24
25
26
27
28
2
3
4
5
6
7
8
9
10
11
12
13
14
15
16
17
18
19
20
21
22
23
24
25
26
27
28
小结:
isBind是false需要显示绑定手机界面
第三方登录-绑定手机
步骤:
- 准备基础页面
- 表单校验
- 发送验证码(拷贝)
- 进行绑定
- 绑定成功即是登录成功,根据是否有回跳地址进行跳转
代码:
1)准备基础页面
vue
<template>
  <div class="login-page" v-if="isBind">
    <cp-nav-bar></cp-nav-bar>
    <div class="login-head">
      <h3>手机绑定</h3>
    </div>
    <van-form autocomplete="off" ref="form">
      <van-field name="mobile" placeholder="请输入手机号"
      ></van-field>
      <van-field name="code" placeholder="请输入验证码">
        <template #button>
          <span class="btn-send">发送验证码</span>
        </template>
      </van-field>
      <div class="cp-cell">
        <van-button block round type="primary" native-type="submit"> 立即绑定 </van-button>
      </div>
    </van-form>
  </div>
</template>
1
2
3
4
5
6
7
8
9
10
11
12
13
14
15
16
17
18
19
20
2
3
4
5
6
7
8
9
10
11
12
13
14
15
16
17
18
19
20
2)表单校验
ts
import { mobileRules, codeRules } from '@/utils/rules'


const mobile = ref('')
const code = ref('')
const bind = async () => {
  // 校验通过
}
1
2
3
4
5
6
7
8
2
3
4
5
6
7
8
html
<van-form autocomplete="off" @submit="bind" ref="form">
  <van-field
    v-model="mobile"
    name="mobile"
    :rules="mobileRules"
    placeholder="请输入手机号"
  ></van-field>
  <van-field v-model="code" name="code" :rules="codeRules" placeholder="请输入验证码">
    <template #button>
      <span class="btn-send">发送验证码</span>
    </template>
  </van-field>
  <div class="cp-cell">
    <van-button block round type="primary" native-type="submit"> 立即绑定 </van-button>
  </div>
</van-form>
1
2
3
4
5
6
7
8
9
10
11
12
13
14
15
16
2
3
4
5
6
7
8
9
10
11
12
13
14
15
16
3)发送验证码
ts
import { Toast, type FormInstance } from 'vant'
import { onUnmounted, ref } from 'vue'
// ... 省略 ...
const form = ref<FormInstance>()
const time = ref(0)
let timeId: number
const send = async () => {
  if (time.value > 0) return
  await form.value?.validate('mobile')
  await sendMobileCode(mobile.value, 'bindMobile')
  Toast.success('发送成功')
  time.value = 60
  // 倒计时
  clearInterval(timeId)
  timeId = window.setInterval(() => {
    time.value--
    if (time.value <= 0) window.clearInterval(timeId)
  }, 1000)
}
onUnmounted(() => {
  window.clearInterval(timeId)
})
1
2
3
4
5
6
7
8
9
10
11
12
13
14
15
16
17
18
19
20
21
22
2
3
4
5
6
7
8
9
10
11
12
13
14
15
16
17
18
19
20
21
22
html
  <template #button>
    <span class="btn-send" :class="{ active: time > 0 }" @click="send">
      {{ time > 0 ? `${time}s后再次发送` : '发送验证码' }}
    </span>
  </template>
1
2
3
4
5
2
3
4
5
3)进行绑定
ts
export const bindMobile = (data: { mobile: string; code: string; openId: string }) =>
  request<User>('/login/binding', 'POST', data)
1
2
2
ts
import type { User } from '@/types/user'


// 登录成功
const store = useUserStore()
const router = useRouter()
const loginSuccess = (res: { data: User }) => {
  store.setUser(res.data)
  router.replace('/user')
  Toast.success('登录成功')
}

const bind = async () => {
  const res = await bindMobile({
    mobile: mobile.value,
    code: code.value,
    openId: openId.value
  })
  loginSuccess(res)
}
1
2
3
4
5
6
7
8
9
10
11
12
13
14
15
16
17
18
19
20
2
3
4
5
6
7
8
9
10
11
12
13
14
15
16
17
18
19
20
diff
      loginByQQ(id)
        .then((res) => {
+          loginSuccess(res)
        })
        .catch(() => {
          isBind.value = false
        })
1
2
3
4
5
6
7
2
3
4
5
6
7
- 绑定成功即是登录成功,根据是否有回跳地址进行跳转
stores/modules/user.ts
ts
   // 记录回跳地址
    const returnUrl = ref('')
    const setReturnUrl = (url: string) => (returnUrl.value = url)
    return { user, setUser, delUser, returnUrl, setReturnUrl }
1
2
3
4
2
3
4
Login/index.vue
diff
        <a
+          @click="store.setReturnUrl($route.query.returnUrl as string)"
          href="https://graph.qq.com/oauth2.0/authorize?client_id=102015968&response_type=token&scope=all&redirect_uri=http%3A%2F%2Fconsult-patients.itheima.net%2Flogin%2Fcallback"
        >
          <img src="@/assets/qq.svg" alt="" />
        </a>
1
2
3
4
5
6
2
3
4
5
6
Login/LoginCallback.vue
diff
// 登录成功
const loginSuccess = (res: { data: User }) => {
  store.setUser(res.data)
  // 如果有回跳地址就进行回跳,没有跳转到个人中心
+  router.replace(store.returnUrl || '/user')
  Toast.success('登录成功')
+  store.setReturnUrl('')
}
1
2
3
4
5
6
7
8
2
3
4
5
6
7
8
第三方登录-验证码hook封装
步骤:
- 分析 hook 需要传入参数,返回哪些数据
- 封装 hook 函数
- 使用 hook 函数
代码:
1)分析 hook 需要传入参数,返回哪些数据
参数:
1. 手机号
2. 发短信类型

返回:
1. form 表单响应式数据
2. time 倒计时数据
3. send 发送函数
1
2
3
4
5
6
7
8
2
3
4
5
6
7
8
2)提取函数
ts
import { Toast, type FormInstance } from 'vant'
import { sendMobileCode } from '@/services/user'
import type { CodeType } from '@/types/user'
1
2
3
2
3
ts
// 发送短信验证码吗逻辑
export const useSendMobileCode = (mobile: Ref<string>, type: CodeType = 'login') => {
  const form = ref<FormInstance>()
  const time = ref(0)
  let timeId: number
  const send = async () => {
    if (time.value > 0) return
    await form.value?.validate('mobile')
    await sendMobileCode(mobile.value, type)
    Toast.success('发送成功')
    time.value = 60
    // 倒计时
    clearInterval(timeId)
    timeId = window.setInterval(() => {
      time.value--
      if (time.value <= 0) window.clearInterval(timeId)
    }, 1000)
  }
  onUnmounted(() => {
    window.clearInterval(timeId)
  })
  return { form, time, send }
}
1
2
3
4
5
6
7
8
9
10
11
12
13
14
15
16
17
18
19
20
21
22
23
2
3
4
5
6
7
8
9
10
11
12
13
14
15
16
17
18
19
20
21
22
23
3)使用函数
ts
const { form, time, send } = useSendMobileCode(mobile, 'bindMobile')
1
第三方登录-开发生产环境
步骤:
- 知道使用 什么是开发环境和生成环境?
- run dev 是本地开发环境,run build 是线上生产环境
- QQ回调地址:
- 支付回调
- 标题:生产环境(优医问诊),本地环境(本地-优医问诊)
代码:
.env.development
VITE_APP_CALLBACK=http://consult-patients.itheima.net
VITE_APP_TITLE=本地-优医问诊
1
2
2
.env.production
VITE_APP_CALLBACK=https://cp.itheima.net
VITE_APP_TITLE=优医问诊
1
2
2
JS文件中
- 跳转QQ登录
Login/index.vue
ts
const qqUrl = `https://graph.qq.com/oauth2.0/authorize?client_id=102015968&response_type=token&scope=all&redirect_uri=${encodeURIComponent(
  import.meta.env.VITE_APP_CALLBACK + '/login/callback'
)}`
1
2
3
2
3
html
  <a @click="store.setReturnUrl($route.query.returnUrl as string)" :href="qqUrl">
    <img src="@/assets/qq.svg" alt="" />
  </a>
1
2
3
2
3
2)CpPaySheet 加入动态域名
diff
  const res = await getConsultOrderPayUrl({
    orderId: orderId,
    paymentMethod: paymentMethod.value,
+    payCallback: import.meta.env.VITE_APP_CALLBACK + payCallback
  })
1
2
3
4
5
2
3
4
5
3)配置问诊支付回调 Consult/ConsultPay.vue User/ConsultDetail.vue
diff
      <cp-pay-sheet
        v-model:show="show"
        :order-id="orderId"
        :actualPayment="payInfo.actualPayment"
        :onClose="onClose"
+        pay-callback="/room"
      />
1
2
3
4
5
6
7
2
3
4
5
6
7
4)配置药品订单支付回调 Order/OrderPay.vue
diff
    <cp-pay-sheet
      :orderId="orderId"
      :actualPayment="orderPre.actualPayment"
      v-model:show="show"
+      payCallback="/order/pay/result"
    />
1
2
3
4
5
6
2
3
4
5
6
index.html中
安装 html 模板插件
bash
pnpm add vite-plugin-html
1
vite.config.ts
ts
import { createHtmlPlugin } from 'vite-plugin-html'
1
ts
plugins: [
  createHtmlPlugin()
]
1
2
3
2
3
index.html <%=环境变量名%> 取出值
html
  <head>
    <meta charset="UTF-8" />
    <link rel="icon" href="/favicon.ico" />
    <meta name="viewport" content="width=device-width, initial-scale=1.0" />
    <title><%=VITE_APP_TITLE%></title>
  </head>
  <body>
    <div id="app"></div>
    <script type="module" src="/src/main.ts"></script>
    <script
      src="https://connect.qq.com/qc_jssdk.js"
      data-appid="102015968"
      data-redirecturi="<%=VITE_APP_CALLBACK%>/login/callback"
    ></script>
1
2
3
4
5
6
7
8
9
10
11
12
13
14
2
3
4
5
6
7
8
9
10
11
12
13
14
扩展-真机调试
- 在 Chrome 浏览器中使用什么进行调试?
- 控制面板,开发者工具,F12
- 在 手机端 浏览器使用什么进行调试呢?
- Eruda 手机调试面板工具
使用方式:https://github.com/liriliri/eruda
index.html
html
    <script src="https://cdnjs.cloudflare.com/ajax/libs/eruda/2.4.1/eruda.min.js"></script>
    <script>eruda.init()</script>
1
2
2
只在开发环境使用:
html
    <% if(DEV){ %>
    <script src="https://cdnjs.cloudflare.com/ajax/libs/eruda/2.4.1/eruda.min.js"></script>
    <script>eruda.init()</script>
    <% } %>
1
2
3
4
2
3
4
小结:
- 使用 vite-plugin-html 解析模板,默认支持 ejs 模板引擎语法
扩展-mock接口数据
https://www.npmjs.com/package/vite-plugin-mock
1)安装 vite-plugin-mock mockjs
bash
pnpm i vite-plugin-mock mockjs -D
1
2)使用插件扫描 src/mock 下文件
ts
import { viteMockServe } from 'vite-plugin-mock'
1
ts
plugins: [
    viteMockServe({
      mockPath: './src/mock',
      localEnabled: true
    })
]
1
2
3
4
5
6
2
3
4
5
6
3)mock文件 src/mock/index.ts
ts
import type { MockMethod } from 'vite-plugin-mock'
import Mock from 'mockjs'

const rules: MockMethod[] = [
  {
    url: '/patient/message/list',
    method: 'get',
    timeout: 1000,
    response: () => {
      const data = []
      for (let i = 0; i < 10; i++) {
        data.push(
          Mock.mock({
            id: '@id',
            avatar: '@image("100x100")',
            title: '@ctitle(3,10)',
            lastContent: '@ctitle(10,40)',
            sendTime: '@datetime()'
          })
        )
      }
      return {
        code: 10000,
        message: '获取数据成功',
        data
      }
    }
  }
]

export default rules
1
2
3
4
5
6
7
8
9
10
11
12
13
14
15
16
17
18
19
20
21
22
23
24
25
26
27
28
29
30
31
2
3
4
5
6
7
8
9
10
11
12
13
14
15
16
17
18
19
20
21
22
23
24
25
26
27
28
29
30
31
使用注意:
- 这些mock接口是 vite 本地服务器提供的,请求的时候不能带上其他服务器的域名。
项目部署-pm2部署
1)本地打包
sh
pnpm build
1
得到 dist 资源包
2)上传服务器
服务器一般是 linux系统,使用 XFTP 进行文件的上传和下载(这个就不赘述了)
3)服务器使用pm2进行部署(本地演示) 托管静态资源
全局安装:
sh
npm i pm2 -g
1
进入dist:
sh
# pm2 serve 目录 端口  --name 服务名称
pm2 serve ./ 8080 --name my-cp-server
1
2
2
4)history路由模式问题,如果有子路径,刷新页面 404
原因:hostory 改变路由是前端切换,不会请求服务器,一旦刷新浏览器 /consult/dep按照这个地址请求服务器,是没有对应的资源的。
解决:遇见子路径且没有后缀名,服务器定位到 ‘index.html’ 页面返回给前端即可。
命令:
sh
pm2 serve --spa ./ 8080 --name my-cp-server
1
pm2其他命令:
sh
# 查看服务列表
pm2 list
# 删除服务
pm2 delete my-cp-server
1
2
3
4
2
3
4
自动部署-腾讯云部署
- 注册,实名认证,才可以使用 webify 服务
使用步骤演示:
1)创建应用

2)关联码云,需要码云授权
3)选择需要使用的仓库
4)构建配置
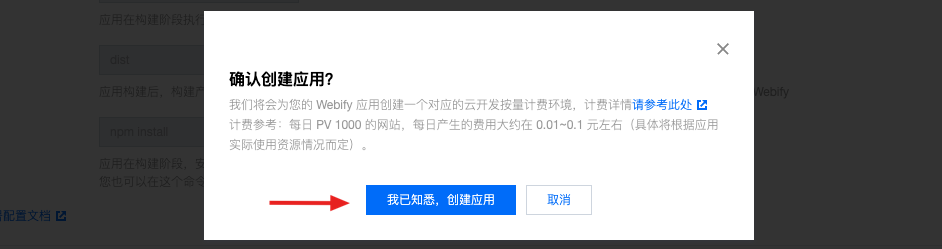
5)进行构建
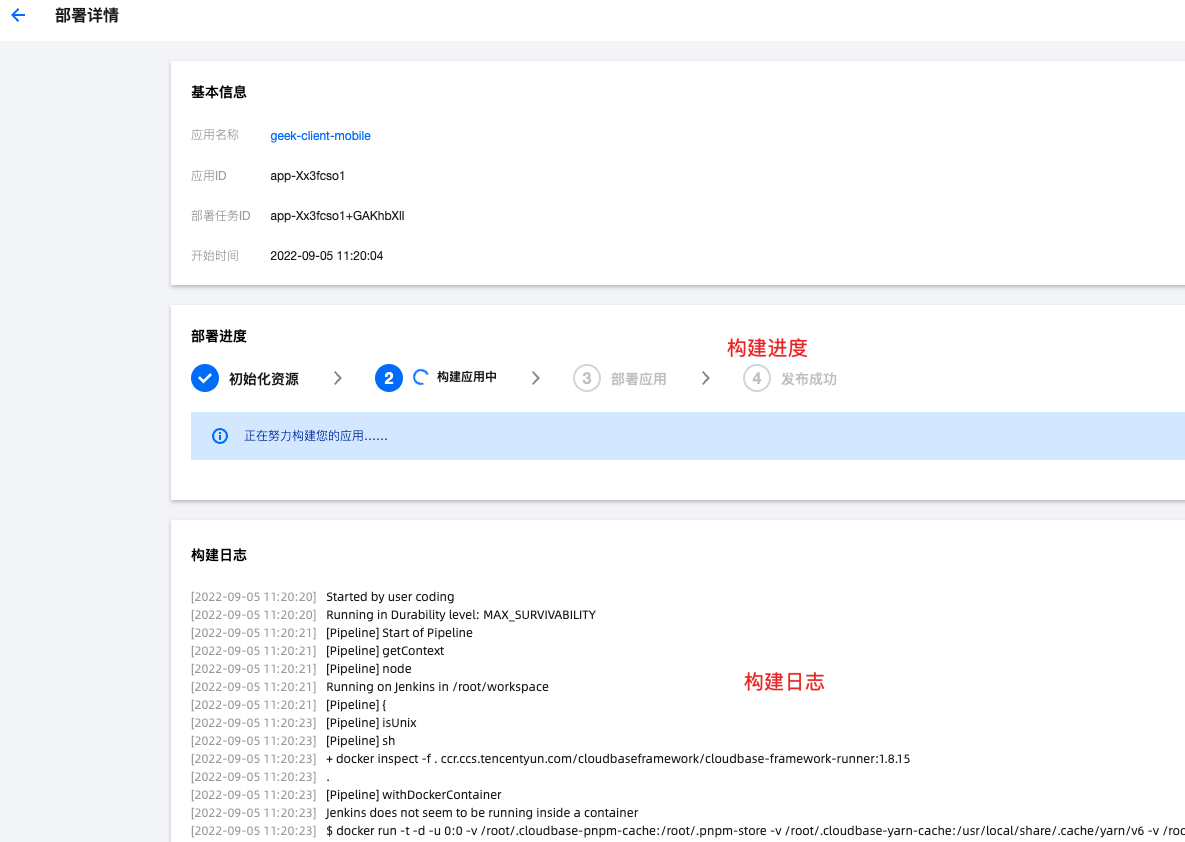
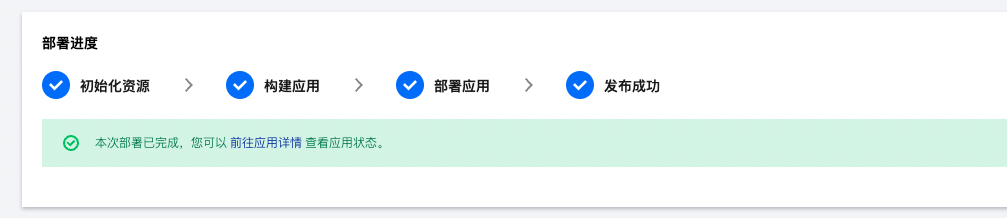
6)尝试访问
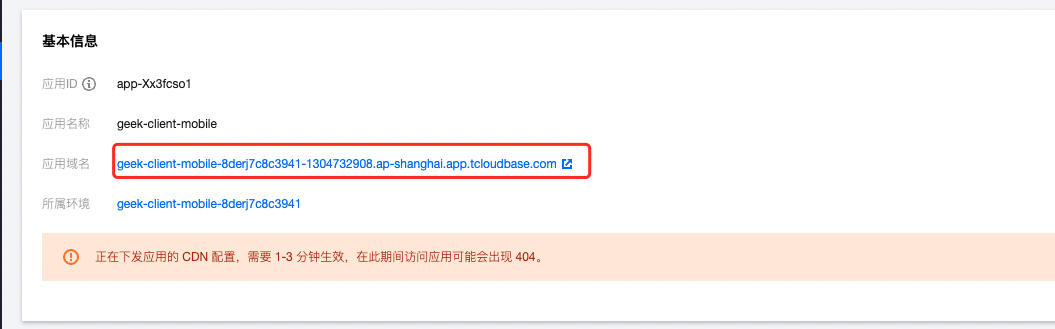
自动部署流程:

自动部署-gitlab部署(演示)
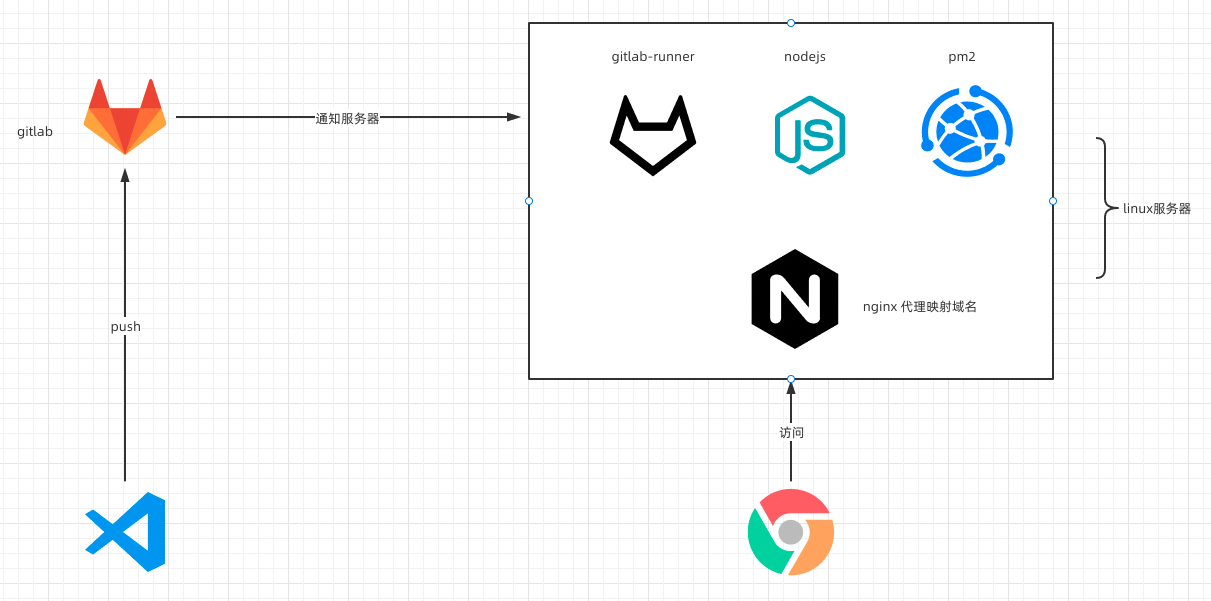
- 本地Vscode编写代码
- gitlab是企业版,内部部署
- Linux服务器
- 安装 gitlab-runner 用于拉取仓库代码
- 安装 Nodejs 用于打包项目
- 安装 pm2 用于启动静态资源托管,守护进程
- 运维使用 Nginx 进行域名代理
- 用户通过浏览器访问服务
依赖于gitlab-ci.yml配置文件
text
stages:
  - build
cache:
  key: ${CI_BUILD_REF_NAME}
  paths:
    - node_modules/

build-140:
  stage: build
  only:
    - master
  script:
    - rm -rf node_modules/
    - pnpm i
    - pnpm build
    - rm -rf /home/patient-h5-preview
    - mkdir /home/patient-h5-preview
    - cp -r dist/* /home/patient-h5-preview
    - cd /home/patient-h5-preview
    - pm2 delete patient-h5-preview || echo no
    - pm2 serve --spa ./ 8083 --name patient-h5-preview
  tags:
    - patient-h5-preview
1
2
3
4
5
6
7
8
9
10
11
12
13
14
15
16
17
18
19
20
21
22
23
2
3
4
5
6
7
8
9
10
11
12
13
14
15
16
17
18
19
20
21
22
23